
BUILD YOUR OWN IMITATION MAC PRO
(IN A GENUINE MAC PRO ALUMINMIUM CASE)
(IN A GENUINE MAC PRO ALUMINMIUM CASE)
 |
| My Imitation Mac Pro Running OSX 10.6.6 (Utilising the displayport input of my 27" iMac!) |
Ok let me start by saying, a hackintosh is NO SUBSTITUTE for a GENUINE MAC, if you're after reliability and maintenence free computing then a hackintosh is NOT for you!
Also legally speaking by installing OS X on non mac Hardware you are breaking the EULA Agreement That comes with your Mac OS X Install Package. Please make sure you pay for OS X if you go down the hackintosh route apple DESERVE to get paid for their software, whether its running on their approved hardware or not.
Hackintoshs are certainly not the easiest things to set up or maintain, and I certainly wouldn't recommend running one as your primary machine. However building a Hackintosh can be a very rewarding project to undertake.
There is a wealth of information about creating your own Hackintosh available online and a number of online communities dedicated to this very cause, so if you choose to build one of these machines you won't be on your own!
In years gone by if you wanted to run apple's ground breaking operating system, you needed to own a GENUINE Apple machine, running on hardware and architecture designed specifically to run the macintosh operating system. This Hardware was generally powered by powerpc processors, meaning that widespread intel chips found in everyday PC's were unable to run the mac os.
However around 2005 this all changed when Apple decided to use intel chips in their desktop machines, a move which both enabled them to build faster more groundbreaking machines but at the same time got people thinking hmmm now that apple are using intel chips, does this mean that I can install the mac operating system (OSX) on my PC? well the answer is both Yes AND No!
It all boils down to what hardware you have at your disposal, as some pieces of hardware are more compatible than others, some hardware combinations can run mac osx almost perfectly after the necessary patches and fixes have been applied.
Again there is no substitute for a genuine mac that JUST WORKS, as many people in the hackintosh community will attest to, it is however a fun project, that will put your technical skills to the test!
IF YOU'RE STILL READING THEN I GUESS YOUR THINKING SHOW ME HOW TO MAKE A HACKINTOSH!!
KEEP READING AND WILL SHOW YOU HOW I MADE THE SYSTEM PICTURED ABOVE!
KEEP READING AND WILL SHOW YOU HOW I MADE THE SYSTEM PICTURED ABOVE!
First things First lets talk hardware, if you want to build a fully operational hackintosh you’re going to have to make sure you buy the most compatible components for whichever version of mac os you want to run.
If you’ve already bought your hardware and are wanting to install osx onto your existing hardware, I would recommend checking out the osx86 hardware compatibility list at:
If you’re hardware isn’t list on here then you may run into trouble getting a fully functional osx build running on your existing hardware.
I personally want to build a hackintosh for the sole intention of bluray support, as I have a whole load of Family videos that i want to fit onto multiple blurays, and with blu ray software beginning to emerge for the mac, I want to utilise the new technology which at present is not available direct from Apple.
Running this software will require my hackintosh to run osx at a minimum version of 10.6.6 (so I can take advantage of the apple app store and all the latest mac osx updates)
I also want to run My current 27" iMac as my Hackintosh's Primary Screen, via the displayport input function available on the new 27"iMacs. this required a lot of research into which cards will run successfully in osx and output via Displayport which is why I decided to use the Zotac Geforce GT430 Graphics Card. if you do not require displayport output then there are a wealth of graphics cards you can choose from! just check out the osx86 hardware compatibility list first before spending your hard earned cash!
My Hackintosh will Contain the following Components:
GENUINE PURCHASED MAC OSX SNOW LEOPARD INSTALL DVD (with iLife Suite) - £72
Gigabyte G31m-ES2l motherboard - £35
Zotac Geforce GT430 1gb Pci-E Graphics Card (with display port output) - £60
Intel Q8400 2.66ghz Intel® Core™2 Quad Cpu - £117
4GB Corsair TwinX XMS2 Kit (2x2gb) DDR2 RAM - £50.50
1TB Samsung Sata Hard Drive - £40
Corsair PSU TX650 High Performance Power Supply - £70
Pioneer x12 Bluray Writer - £100
USB wifi adapter - £12 (ebay)
Mac Firewire Card - £8
USB Backing Plate - £7
Euro Chassis Plug - £4
Donor Kettle Lead - £2.40
Empty/Donor MacBook G5 Case/Enclosure - £50
120mm Internal fan x2 (£12.28)
80mm internal system fan x2 - £4.78
Displayport to mini Displayport Cable £8
Displayport to mini Displayport Cable £8
TOTAL: £652.96
Factor in the cost of a decent monitor and you're looking at around £850ish for a very fast bluray writing equipped hackintosh (mac minis can be picked up for around £600 brand new, so you need to ask yourself if you really need the power or will a mac mini suffice?)
Factor in the cost of a decent monitor and you're looking at around £850ish for a very fast bluray writing equipped hackintosh (mac minis can be picked up for around £600 brand new, so you need to ask yourself if you really need the power or will a mac mini suffice?)
Ok so lets get started . . . . . . . .
Open Up your shiny new/old g5 mac pro donor case, if you have a full G5 system inside it will look something like this inside:
 |
| Fully Assembled G5 (Photo Courtesy of google images) |
you will need to strip the hardware out using a selection of torx screw drivers so the case looks like this:
 |
| Stripped Out G5 Case |
the next step is to strip the old g5 wiring out and remove the old g5 motherboard mounting pins as the do not line up with a standard micro atx mounting points, the old mount pins can be EASILY removed with a pair of plyers by gripping them and gently moving the pins from side to side until they pop out.


This will leave you with a pile of mounting pins KEEP THESE SAFE YOU WILL NEED THEM!
The next step is to remove the fan rear fan mount, which is held on by small screws which are visible when you look closely, once these are unscrewed the fan mount will pop out:

The next thing I did was mount my 80mm Fans onto the stock fan mount
carefully mark where you need to drill fan mounting holes and drill the holes into the original g5 fan mount and screw your new fans into the mount (the original mount looks like aluminium but is actually plastic!)

The next step is to mount the new components into the g5 case using the mounting pins you just removed.
The mounting pins are all different sizes but you will find that some of them are the same length, I attached these to the motherboard and sat it in the g5 case with the graphics and pci cards attached to see if it would sit properly in the g5 case.


I used some hi temperature Evo-Stik Serious Glue to mount the old mounting points onto the g5 case and screwed the pci cards into the case to hold motherboard in place whilst to ensure that the mounting sockets stayed in position and lined up with the original g5 pci bracket holes on the donor case. I left it to dry for 24 hours.
 |
| Front Fans in Place and Left To Dry |
After this I mounted some 120mm fans to the front of the case using the evo-stik and screwed the in with standard fan mounts just to hold them in place whilst the glue dried. (the fan mounts were removed after 24hours once the glue had dried)


The next Job was to remove the cover on the switch at the front of the case and solder on a standard atx ON/OFF switch wiring that can be attached to my motherboard to turn it on and off:
there are 3 points on the standard g5 on off switch. One for ground, one for the led and one for the on/OFF switch. these were then connected to the motherboard.
Then it was time to connect the PSU for a test run . . . . . .
Then it was time to connect the PSU for a test run . . . . . .
 |
| Quick Power Test |
SUCCESS it switches it on and off and the front led on the switch works! BONUS!
Next step was the put the rear fans back in:
 |
| Rear Fan Cover Back in Place |
Now its time to mount the psu inside the case, because of space restrictions at the back of the case the psu had to be mounted at the front of the case (the 120mm fans will keep it cool) but to maintain the aesthetics of the rear of the case I will need to mount a euro/kettle plug socket at the rear, to achieve this I had to use a donor kettle lead and cut it and solder it to the donor kettle plug mount and run it to the psu inside the case (hope this makes sense!)


with that done I mounted the backing plate on the rear of the g5 case and ran the extension to the psu in side the case
 |
| Kettle Plug Mounted and Rear Fans in Place |
Now all thats left is to mount the hard disk and the Bluray burner and tidy up the sata and psu cables. Mounting the blu ray drive and hard disk has been made very easy by apple as they both just slot in!
 |
| All Setup and Ready to GO!!! |
Your System should look something like above.
(the big black thing hanging down is an internal 5decibel wifi antenna)
I have put 2 hdds in which I will swap between to run both windows and osx
You Could Now Sit Back and Admire Your Creation or . . . . . . . . . .
You Could Now Sit Back and Admire Your Creation or . . . . . . . . . .
NOW HERE IS THE HARD PART!
INSTALLING OSX 10.6.6
Some of the required downloads require a sign up to different osx community forums, such as tonymac's forum, this guy has really worked hard to help people like us install osx on non mac hardware, and his forum provides people like us with technical support from other people who are running hackintosh's.
Some of the required downloads require a sign up to different osx community forums, such as tonymac's forum, this guy has really worked hard to help people like us install osx on non mac hardware, and his forum provides people like us with technical support from other people who are running hackintosh's.
Another popular (more in depth) guide for my motherboard is available at http://osx86.co/f36/guide-gigabyte-g31m-es2l-retail-tutorial-t3187/ written by voyn1x who is yet another fellow hackintosher who has really helped out the hackintosh community by making it easier to osx running on our hardware.
I have tried many guides online to install osx on my hardware and none of them have ever produced a fully working (or even bootable) hackintosh machine. . . . so here is my VERY BASIC hashed together osx install guide for my hardware
Pre Requisites:
- A GENUINE PURCHASED Snow Leopard Install DVD
- 16gb USB STICK
- A working OSX install (use a friends)
- MyHack Installation Package
- MyHack Installation Package http://osx86.sojugarden.com/downloads/
- Tony Macs MultiBeast & Tony Mac’s Nvidia Package http://www.tonymacx86.com/viewforum.php?f=69/
- Apple OSX 10.6.6 Combo Update http://support.apple.com/kb/dl1349
- A prepatched DSDT.aml File for the g31m-es2l motherboard (made by voyn1x) http://osx86.co/f36/guide-gigabyte-g31m-es2l-retail-tutorial-t3187/
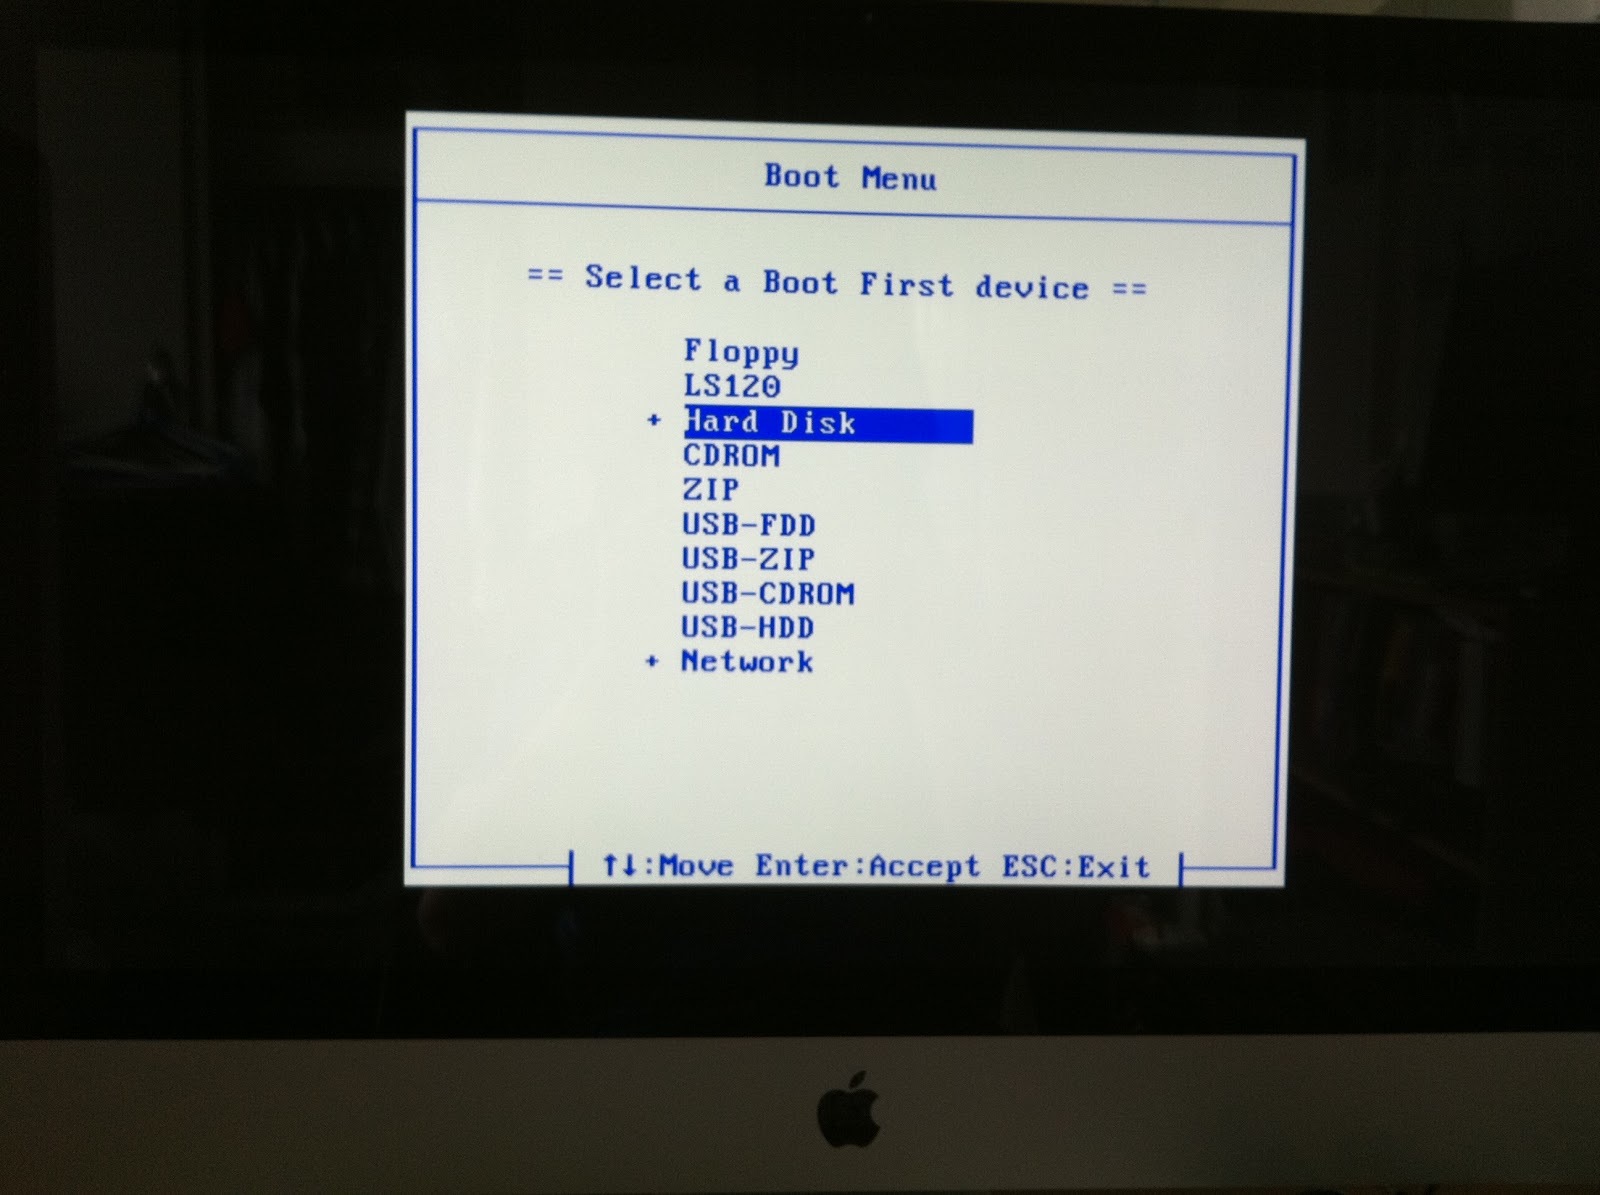
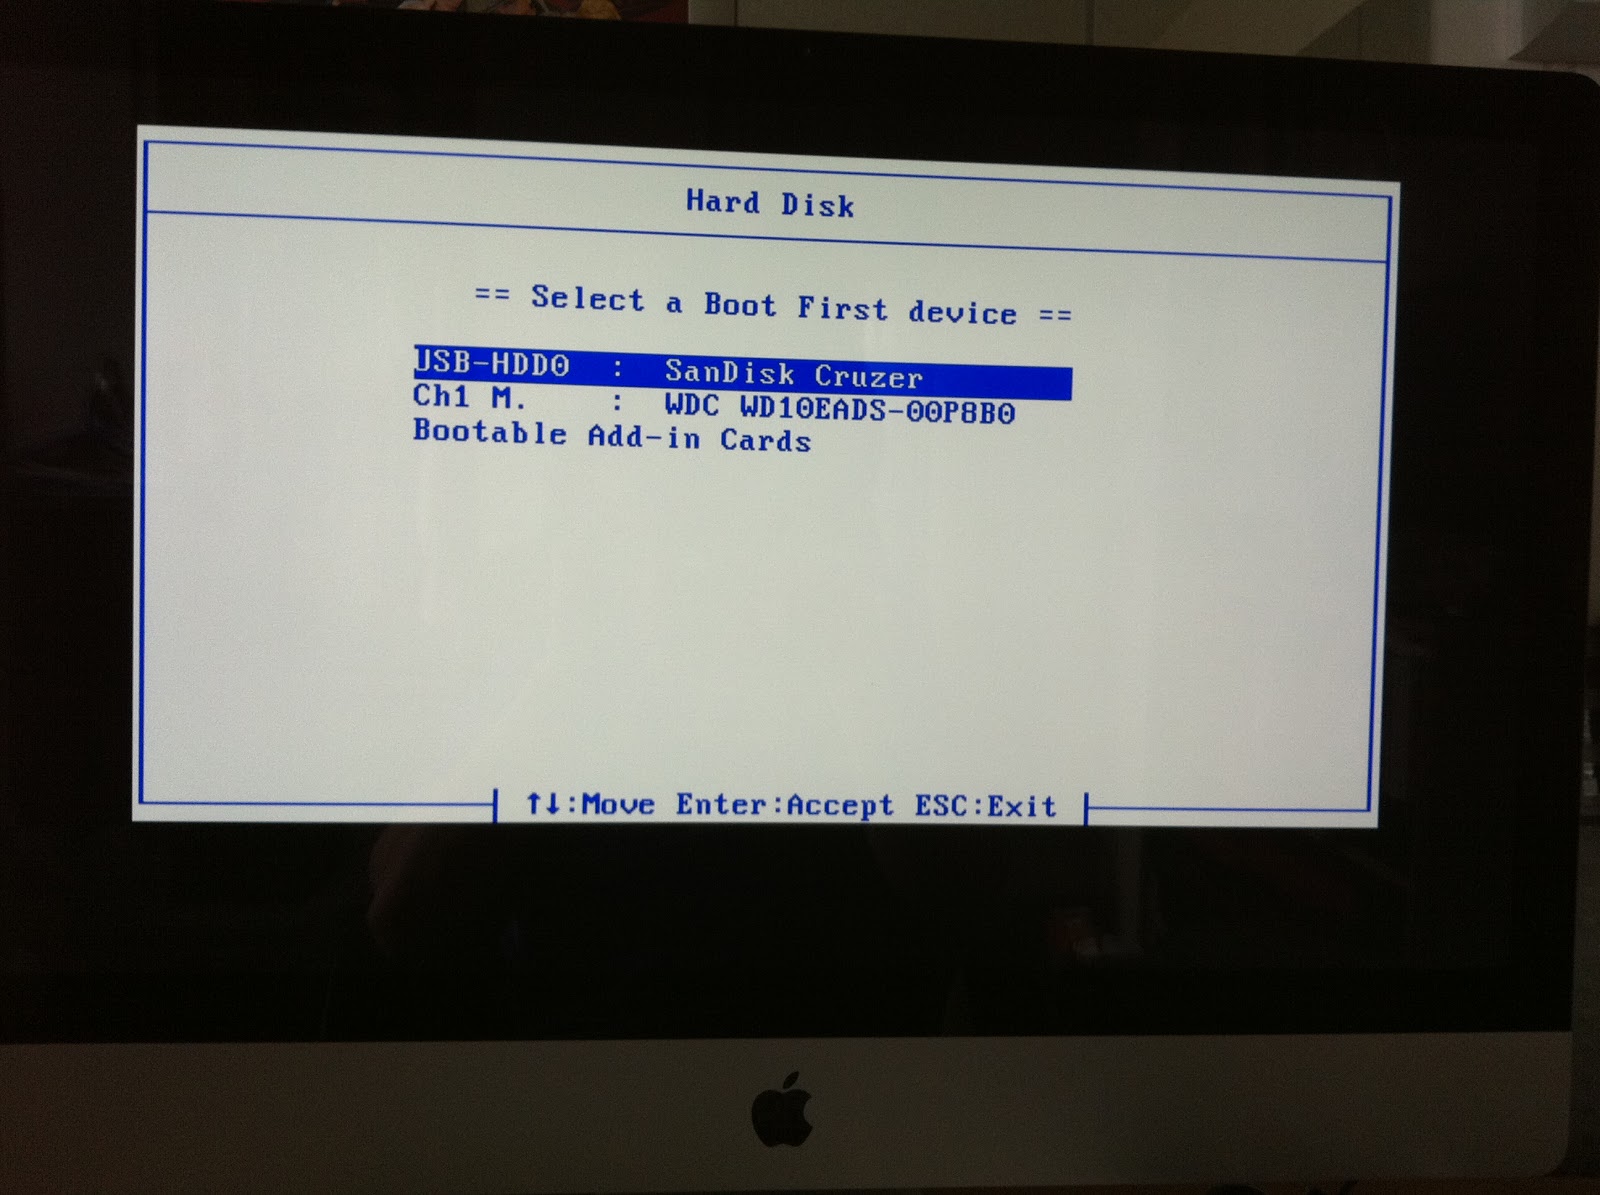
First You Will Need to Make Changes to your BIOS Settings press delete on startup to enter your bios setup utility and make sure your bios settings matches the photos below


The next step involves creating usb bootable installer for Snow Leopard using your GENUINE PURCHASED Snow Leopard Install DVD and your 16gb USB Drive, you NEED to do this on a working installation of OSX (use a friends if you don not have access to one):
So Insert your GENUINE PURCHASED Snow Leopard Install DVD into your Mac’s DVD Drive and connect your 16gb USB Drive then open Open Disk Utility:

 |
| Select the USB Drive and Partition it (Format Mac OS Extended (Journaled) |
 |
| once options is clicked select GUID Partition Table and click OK |

Hit restore, you will be prompted to Erase? hit "Erase" (you may be prompted to enter your admin password to proceed) sit back and let it create your usb stick!

Next Run The My Hack Installation Package and MAKE SURE YOU CHANGE YOUR INSTALL LOCATION TO YOUR USB STICK! IT WILL DEFAULT TO THE PRIMARY PARTITION ON YOUR RUNNING MACHINE!
 |
| Click Change Install Location |
 |
| Select Newly Created Usb Drive |

Nowits time to get your hackintosh up and running!
Put your USB Drive into your new machine and boot it. Press F12 at boot to select Boot Device
 |
| MyHack Boot Screen |
 |
| Apple Loading Screen |
 |
| Choose Your Language |


YOU WILL NOW GET THE OS X WELCOME SCREEN! Go through the process of setting your new mac up, and once youve got through the intial setup screens Load up the 10.6.6 COMBO UPDATE from apple.
NOW RUN THE OSX COMBO UPDATE BUT DO NOT RESTART

ONCE THE COMBO UPDATE HAS FINISHED YOU MUST RUN MULTIBEAST
PUT THE DSDT.aml File FROM ES2L EXTRAS ONTO THE DESKTOP
Load Up MultiBeast

Select The Options Below:

Now Run The downloaded tonymacx86 Nvidia Update

Now Reboot . . . .
You should see the tonymac/Chameleon Bootscreen followed by a fully booting osx install
CONGRATULATIONS!!!
IF ALL HAS GONE TO PLAN YOU WILL NOW HAVE A FULLY OPERATIONAL BLU RAY EQUIPPED HACKINTOSH THAT BOOTS WITH FULL RESOLUTION GRAPHICS AND CAN UTILISE THE DISPLAYPORT IN FEATURE ON THE 27” IMAC!!!


 |
| Proof That OS X Recognises Blu Ray Drives |
Awesome writeup and tutorial, just what I was looking for!
ReplyDelete